Jennifoo

Polymer Clay, DIY & Gifts

Sign up for polymer clay tips & DIYs

Archives for 2021

Super Easy Polymer Clay Canes For Beginners

December 6, 2021 by jennifoo

Create Bulls Eye Canes, Gradient Loaves and Ribbons (Easy Basket Weave Pattern).

bulls eye cane slices arranged in flower pattern
Gradient Bulls Eye Cane Slices

Hi everyone, this is a beginner tutorial on how to create simple canes, loaves and ribbons with polymer clay. In my previous tutorial I walked through how to create a gradient sheets which will be used for the polymer clay techniques in this tutorial. If you haven’t seen that one, it might be really helpful to go over the gradient sheets tutorial first by clicking this link and read it in a separate tab and then come back to this one.

You may read the text below as an outline for what to do, but if you’re like me who prefers to listen and see, you can watch in video format:

Subscribe to my Youtube Channel for daily videos here.

Stretching Gradient Sheets

Before we start on our canes, you want to stretch the sheet. And what I mean is that it’s easier to work with a short wide cane than a long narrow one. Since you can go through a process called cane reduction in order to reduce a wide cane into various sizes in diameter and length. You can always size down in cane circumference, but it’s more trickier to size up.

The purpose of this is to prepare your gradient sheet to become long and skinny as opposed to wide and short. With a long and skinny gradient, you can turn it into a bullseye cane or gradient cane (gradient loaf).

slicing gradient sheet in half
Trim gradient sheet in half
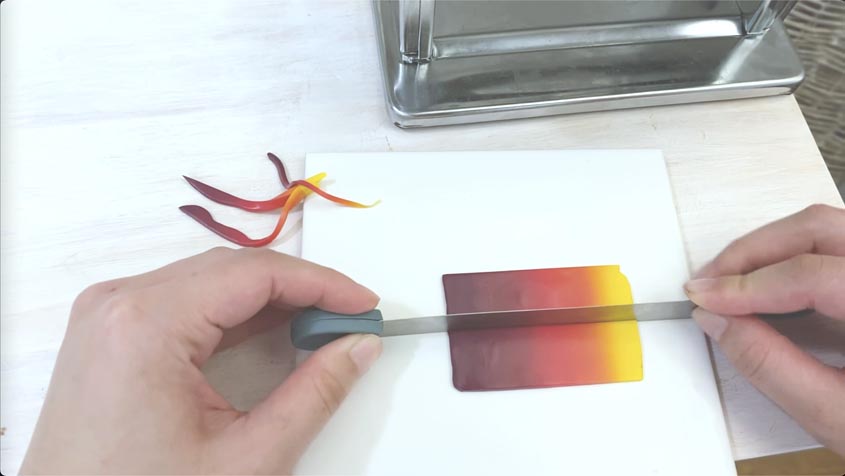
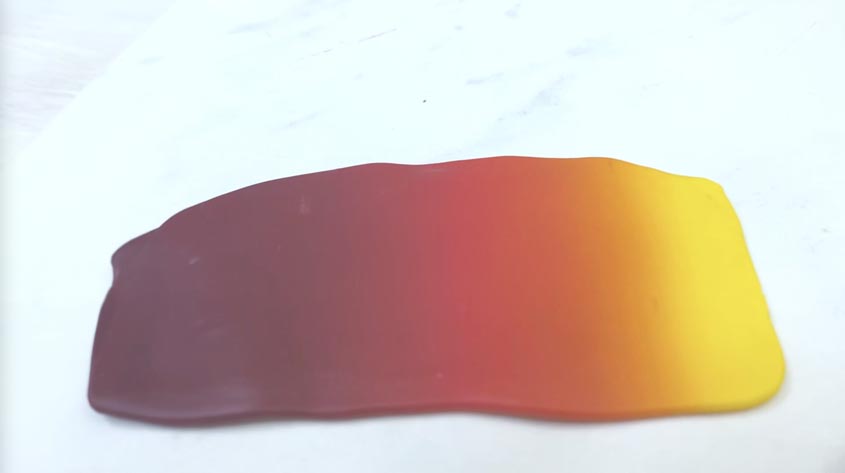
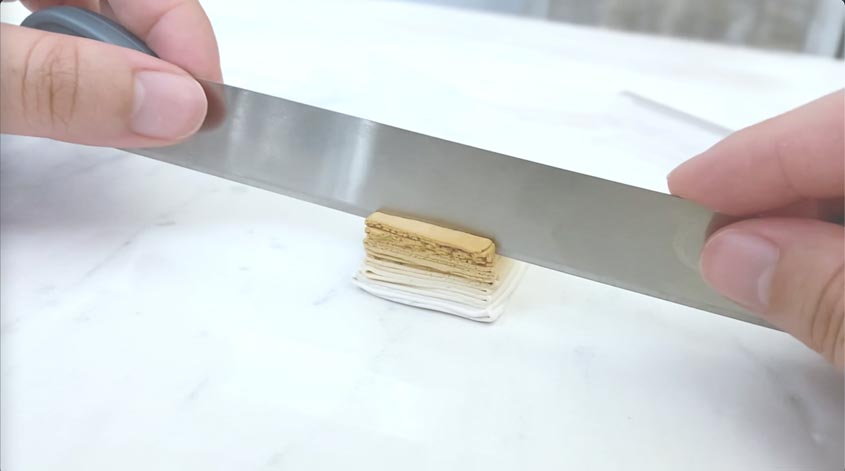
  1. After you’ve created your gradient sheet from Skinner Blends video, trim off some of the edges to make the clay more uniform, then cut the sheet in half and stack one half over the other (see large image above).
  2. Roll the strip through the largest setting of your pasta machine while maintaining control by gently guiding the clay though the rollers. Continue running the clay through the rollers while reducing the thickness setting each time, until you reach the 5th setting. 
    stretching long gradient sheet through pasta machine
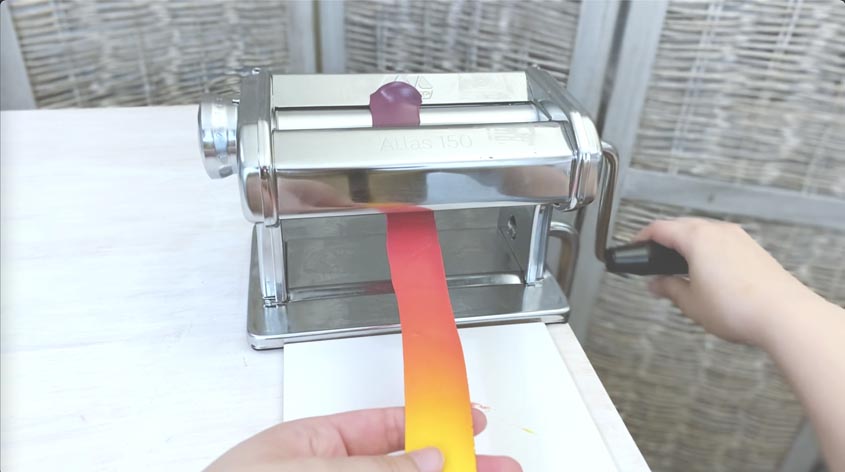
  3. Now you have a stretched sheet of clay at the perfect size for canning.

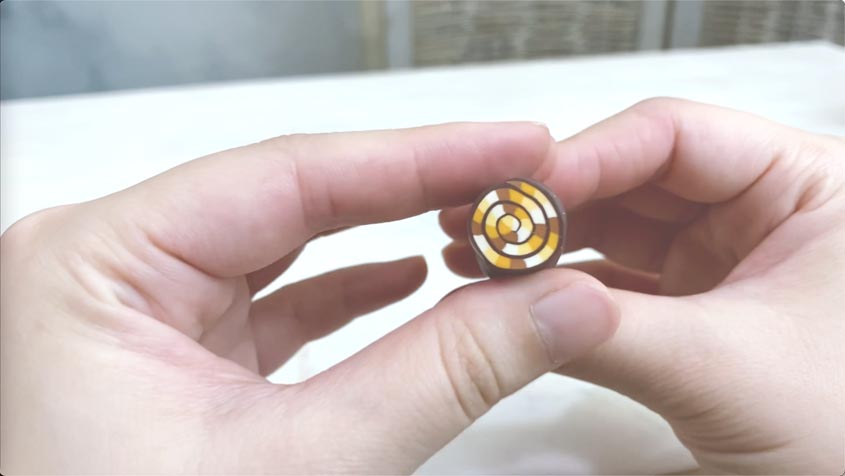
Creating Easy Gradient Cane

Create Gradient Log

yellow log placed on long skinny gradient
Place yellow log onto thin gradient sheet
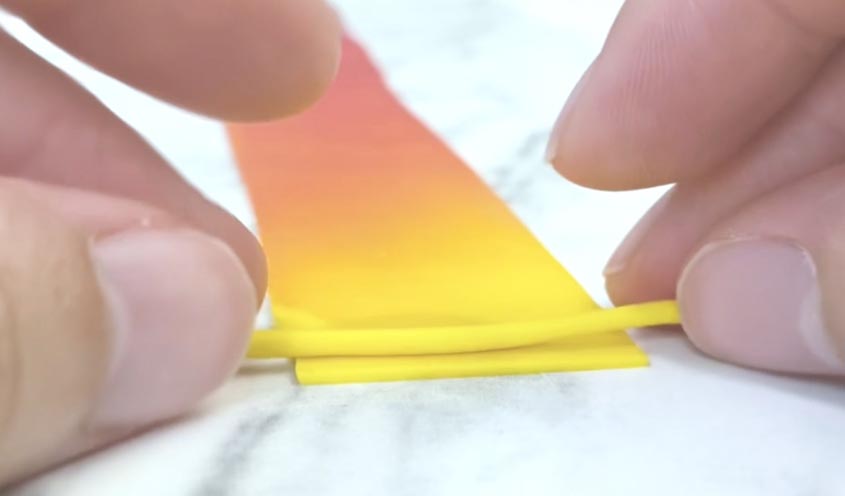
  1. To create a simple gradient cane, decide on what color you’d like to start off at the center. For this example i’ll start off with the center being yellow and it’ll gradate to mauve.
  2. Also, make sure you place your sheet on the surface as straight as possible which will make the rolling process more even.
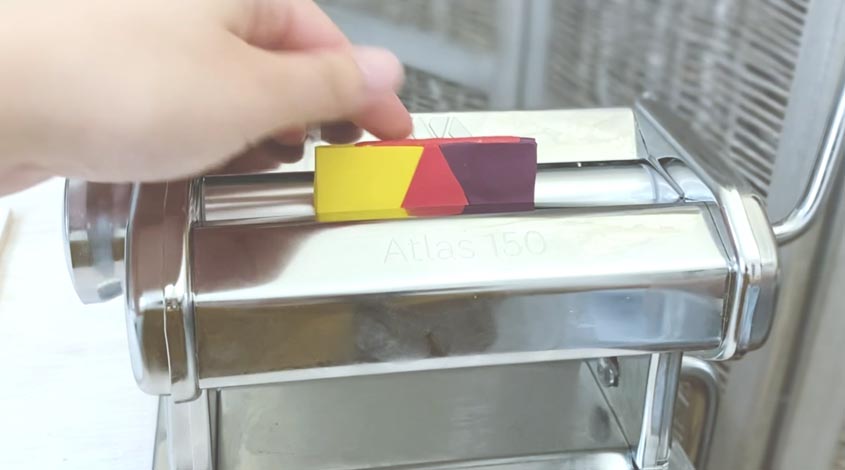
  3. This next step isn’t required, but it helps in creating a tight compact roll which is important in preventing trapped air between layers. Roll a thin log and place it at the end of the sheet where you’ll start the core of the cane (see large image above).
  4. Roll the sheet of clay onto the snake being firm, but being careful not to press down too hard that you might distort the clay.
    rolling bulls eye cane

Trim Gradient Log

slicing bulls-eye cane
Trim gradient log
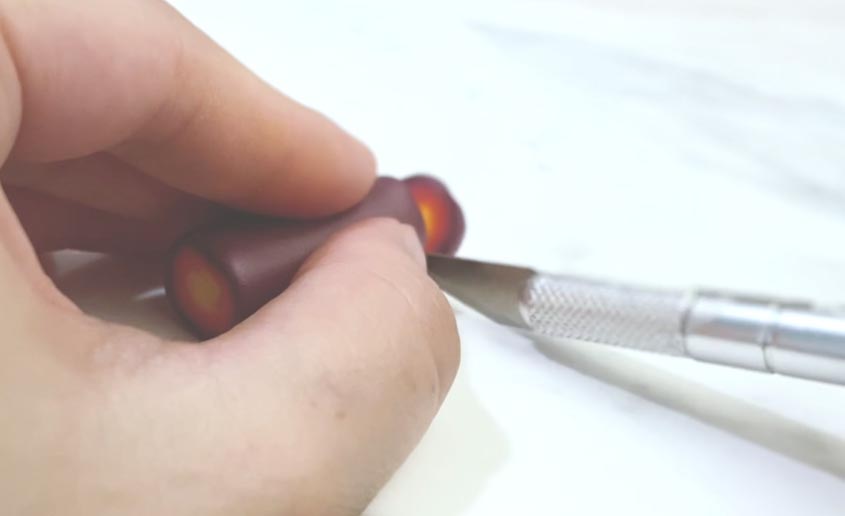
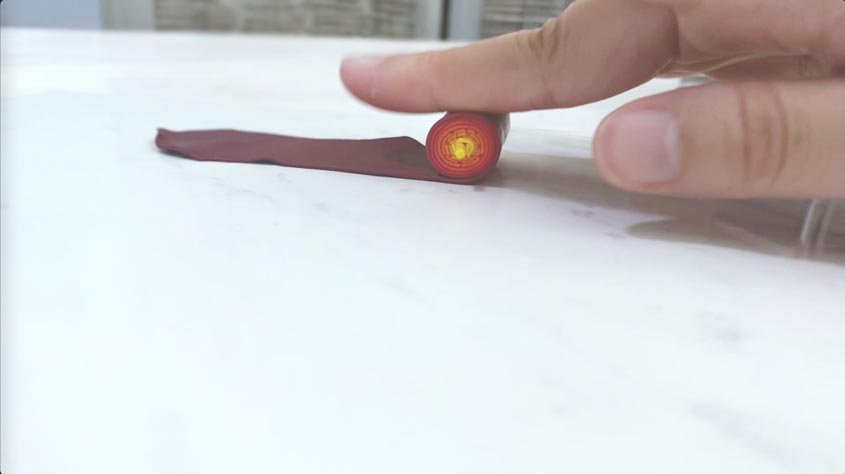
  • The next step would be to trim the opposite ends with a sharp blade. However, it helps if you allow your cane to rest for several hours before slicing so it can regain firmness, making it easier to get clean crisp slices. If you can’t wait, you can freeze your cane for 10 to 15 minutes before cutting. In this video, I didn’t have to time to do either so you’ll see my clay may get pinched in some areas by the pressure of my xacto knife since this is mainly for demo purposes and to show you why it helps to ensure your clay is firm again before cutting.

Cane Reduction

reducing bulls eye cane
Applying Cane Reduction to Bulls Eye Cane
  • After that you want to apply a method called Cane Reduction which reduces the size of the cane, but also helps release air trapped between the layers, prevents the layers from falling apart, reduces internal distortion and gapes in the cane slices. There are various ways to reduce a cane using compression and stretching techniques, but for starters, you can gently squeeze the cane on one end with your index fingers and thumbs while frequently rotating to keep the reduction consistent on all sides.

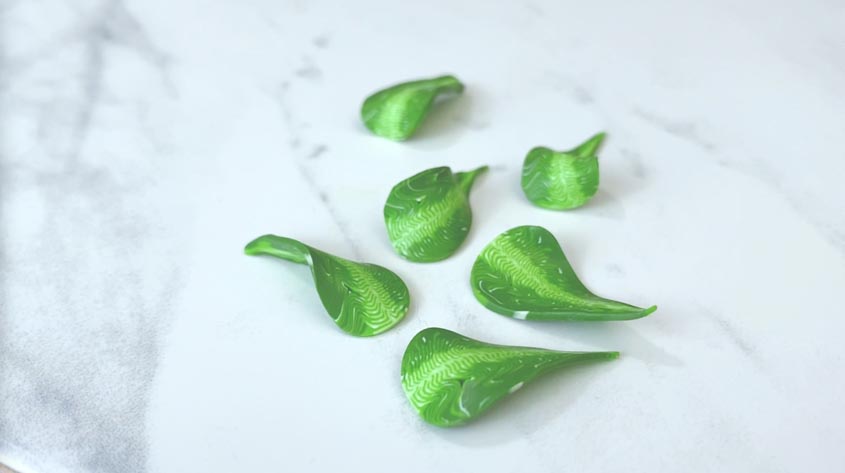
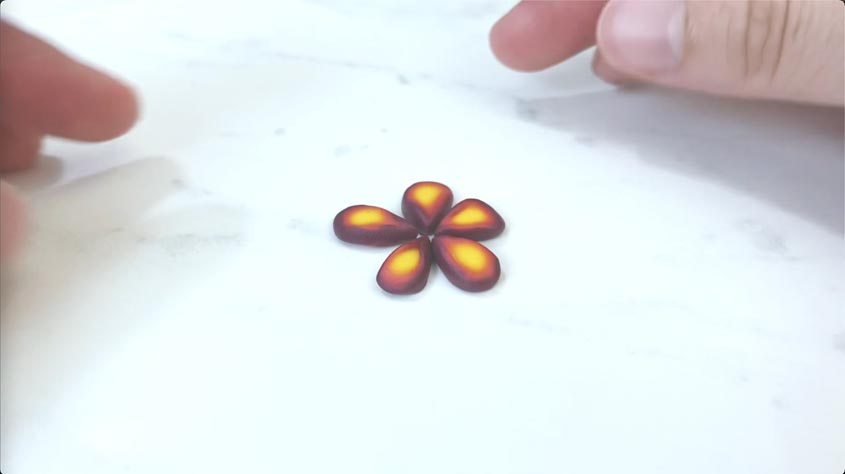
Now you’ve created a cane that you use to create repeatable shapes. For instance you can morph the shape into a teardrop or petal, then reduce the cane into several different sizes to create flowers or other types of patterns.

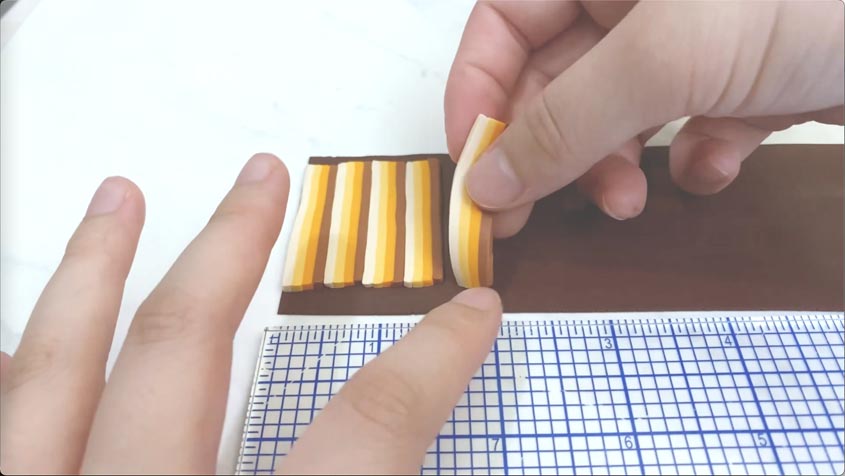
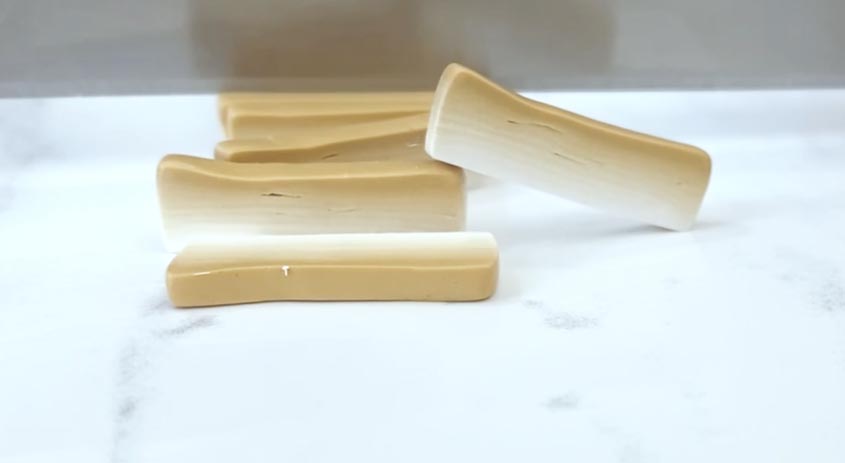
Creating Gradient Loaves

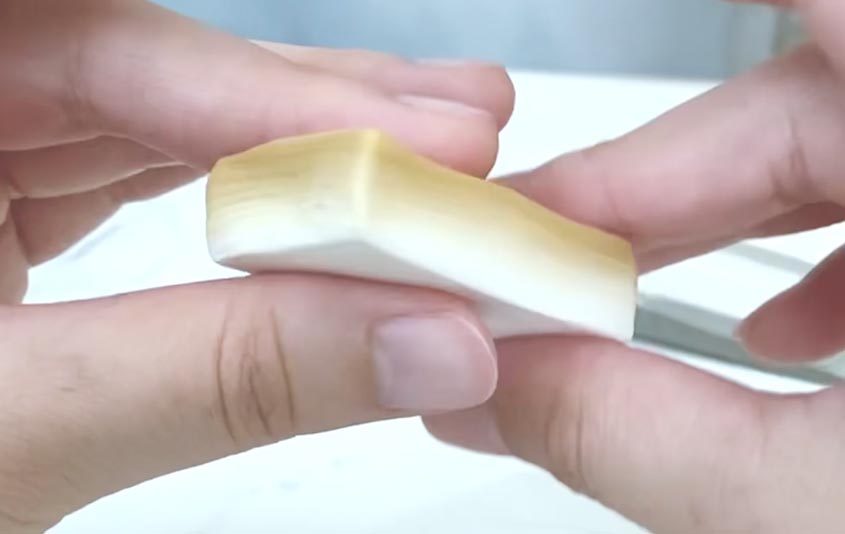
Gradient loaves are essentially square canes with a gradient pattern.

completed gradient loaf
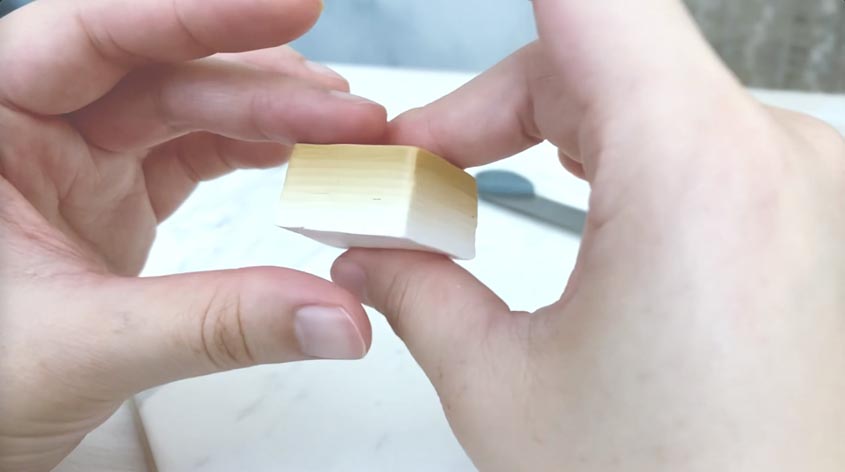
  1. To start off, you want to stretch your sheet in the same way you did with canning.
  2. Fold the clay back and forth like an accordion in 1/2″ to 1″ wide intervals. Do not press the clay together too firmly while doing this.
    yellow to white gradient cane folding
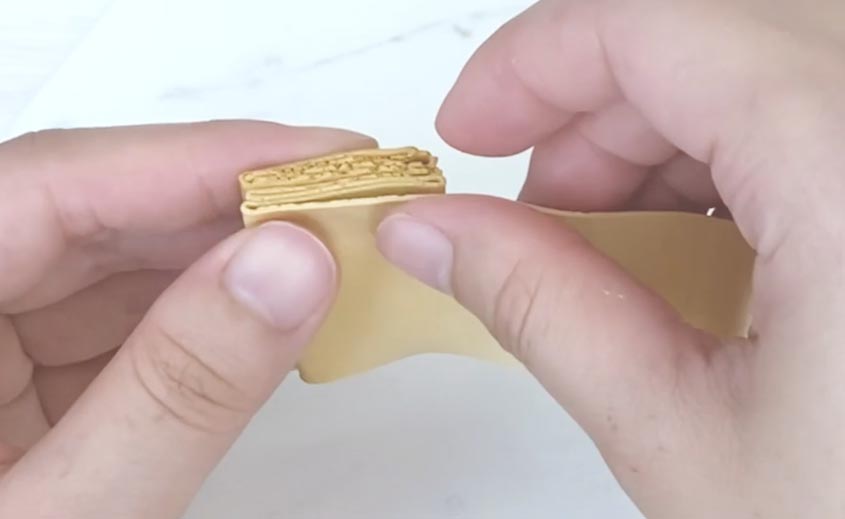
  3. Once the clay has been completely folded, gently compress the stack together with your fingers or an acrylic roller to remove any air pockets.
    acrylic roller over gradient cane
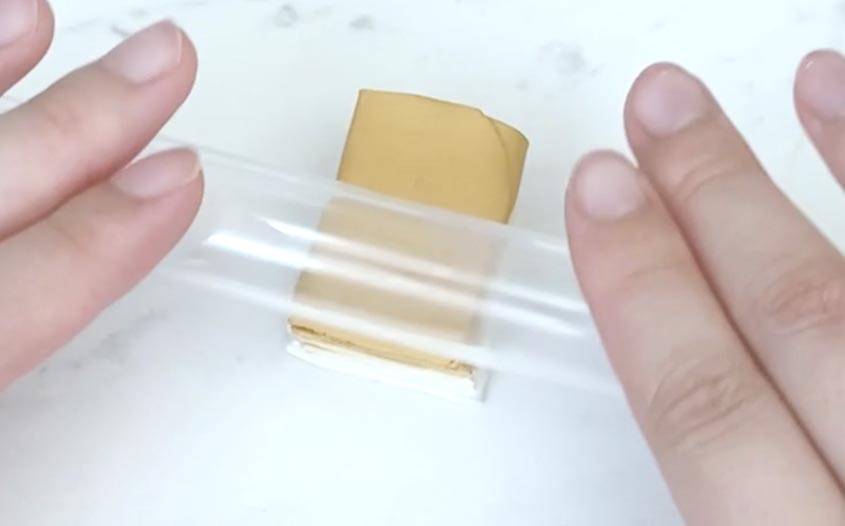
  4. Trim the excess clay off at the opposite ends of the strip. You can also trim another side, but leaving one side untrimmed can give you an anchor when slicing the last bit of loaf, giving you more usable clay.
    slicing distorted ends off gradient loaf
  5. Then you can utilize cane reduction to remove any other excess air pockets in between layers of the clay.
    gradient loaf with yellow to white

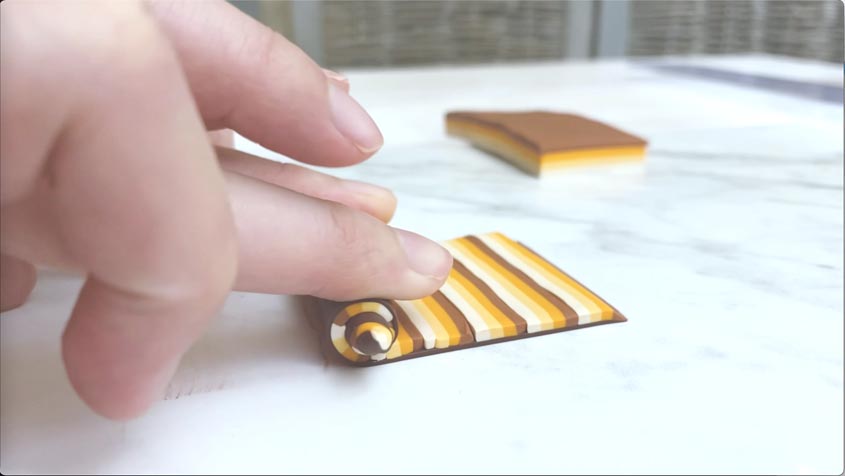
Gradient loaves can be used as background sheets for small applications. You can also enlarge them by backing them with thicker layers of white clay or connect multiple sheets at 45 degree angles.
slice of gradient loaf

Creating Basket Weave Pattern

Ribbons are gradient loaves, but they give an illusion of a satin ribbon. When you assemble multiple ribbons, you can create the illusion of a basket-woven pattern.

polymer clay basket weave
Basket Weave Pattern Assembled with Ribbons (two gradient slices mirrored together)
polymer clay basket weave pattern up close
Basket Weave Flattened Through Pasta Machine
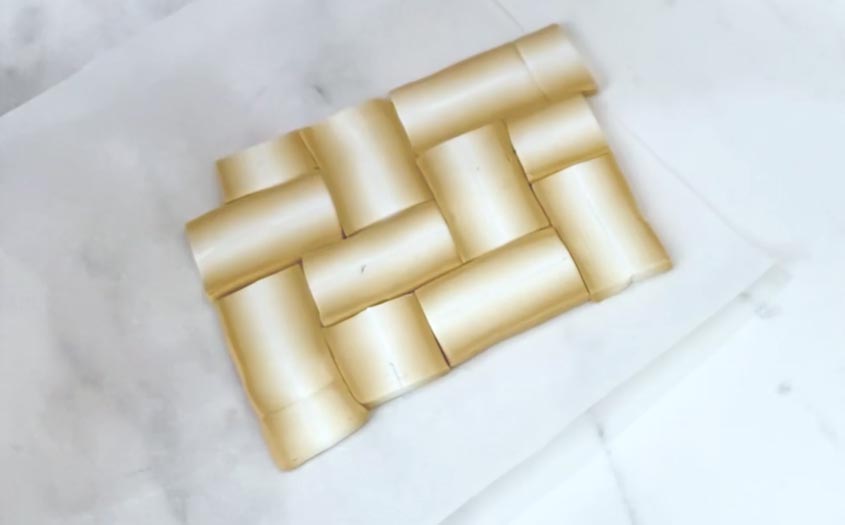
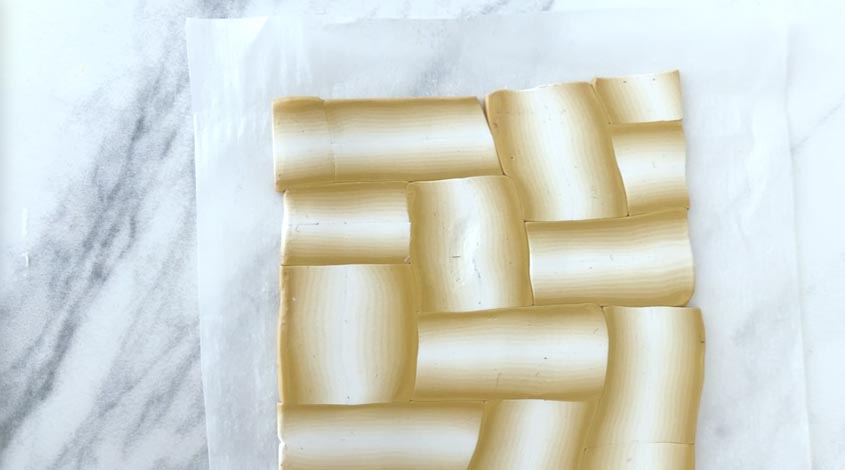
  • To create a ribbon, you need a gradient loaf that goes from light to dark.
    polymer clay gradient loaf slices
  • Slice the loaf several times and assemble two pieces together so that the lightest sides are facing inward.
    polymer clay gradient ribbon
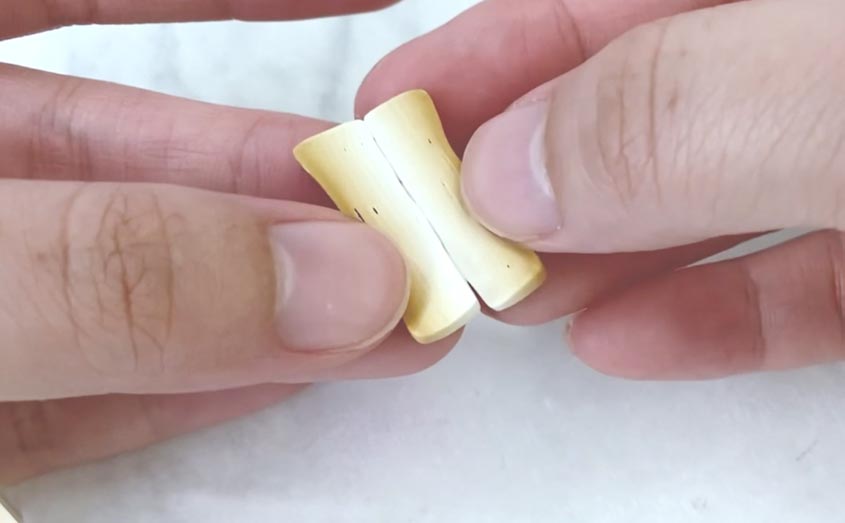
  • If needed, you can stretch certain pieces and arrange them to create a basket-woven appearance.

Did you find this helpful? Get notified of new content releases:

Sign up for News or Notifications

Playlist on Polymer Clay Beginner Tutorials

Playlist on Polymer Clay Cane Tutorials

Filed Under: Beginner Polymer Clay Tutorials

How to Create Eye-Popping Gradients in Clay!

December 6, 2021 by jennifoo

Say Hello to the Skinner Blend Polymer Clay Technique.

Want to up your polymer clay game? Learn the Skinner Blend Technique and you’ll be able to produce more visual dimension and depth with your canes, veneers, sculptures and other polymer clay projects!

You may read the text below as an outline for what to do, but if you’re like me who prefers to listen and see, you can watch in video format:

Subscribe to my Youtube Channel for daily videos here.

So what is the Skinner Blend Technique?

The Skinner Blend Technique allows you to create gradated colors with polymer clay. This innovative method was invented by Judith Skinner, who used a mathematical theory to significantly reduce the amount of time it takes to create gradients. 

skinner blend

Before, her technique was introduced to the polymer clay world, it would take hours or days in order to mimic a gradated look, but with this method, gradients with polymer clay will only takes a couple of minutes. A pasta machine makes this go much faster, but of course, you can also do this with an acrylic roller or brayer though it would a bit longer.

First i’m going to show you how to create a 2 and 3 color gradient, then, how to limit the width of your gradient sheet, and then talk about the different things you can do with it.

The First important tip is to use enough clay:

  • Create a template: for testing out this technique you can start small, cut out a 2.5 x 1.75 inch template out of cardstock — I wouldn’t go to much smaller than that, otherwise it gets difficult when the clay gets shorter and shorter each time your fold it. Alternatively, a standard 3 x 5 inch index card can also be used as a template, though it will create a bigger finished sheet.
    polymer clay skinner blend template

Test the Blend

  • Next, choose your colors: Test out how those colors look when blended to see if you like the way it looks. Even with an understanding of color theory, colors of clay blended together sometimes produce unexpected results such as looking duller or muddy once mixed.
  • Example of color mixing going well (white and mustard mix):
    skinner blend color test
  • Example of color-mixing gone bad (mixed Sculpey Premo orange and purple, but it gave me a muddy result):
    polymer clay skinner blend color test
  • If you are pleased with the way it looks, condition and run your selected colors of clay through the largest setting of your pasta machine and cut out a rectangle from each color using the template you created earlier.
template on top of sheet of mustard clay

2-Color Skinner Blend Template:

Decide if you want to do a 2-color or 3-color blend. For a two color blend, you want use a tissue blade to cut diagonally across each sheet to create 2 Right Triangles. If cutting corner to corner, you get a more subtle end result. However, I usually prefer to offset it by a half-an-inch or so for a more dramatic effect. This will leave some of each original color at the end of the color blend.

skinner blending cutting clay
  • Next stack the same color triangles, one over the other. This step can actually be skipped if you are just testing this technique out and want to save your clay. 
    skinner blending stacking clay
  • Next, put the triangular pieces together to form the original rectangle shape. Wether you are using double thick triangles or one-layered triangles, the effect will be the same, just depends on how much clay you want to use.
    yellow and white clay shapes being put together

3-Color Skinner Blend Template

To do a 3-colored gradient, the steps are very similar to the 2-color. You would make a template of 2 right triangles at the sides, but there would be an additional triangle in the middle for every new color you want to add.

3 color skinner blend template cutouts - 3 triangles
3-color Skinner Blend Template
  • Then, using your template, cut each shape out of the clay. 
    triangle cutouts on top of clay being cut
  • Then assemble them into a rectangle — if you’d like, you can adjust the size of the triangles on the template to customize the color portions. You don’t have to do it exactly how i’ve done it.
    mauve, red and yellow triangles pieced together
  • Wether you are doing 2-color or 3-colors or more, they all go through the same folding process I cover in the next section.

The next step would be to fold your sheets and insert them into the pasta machine multiple times until the colors blend smoothly.

How to Feed Skinner Blend Through Pasta Machine

After you’ve made either a 2-color or 3-color lockup, we’re going to feed it through the pasta machine first without folding to meld the pieces together.

  • Next, make sure the side edges after folding are identical in color (so on one side edge, mauve should be touching mauve only, and on the other side edge, yellow should be touching yellow only). One side should be one color, and the other side should be the color. However, across the length of the roller, you may have multiple colors.
finger pointing to mauve portion on skinner blend
3-color Skinner Blend: mauve on the left and yellow on the right
  • Take your 2-color or 3-color sheet, fold the sheet in half and feed it through largest setting of the pasta machine.
3 color skinner blend being folded in half
folded skinner blend feeding through pasta machine
  • Keep doing this until your gradient is smooth and well blended.

Use Width Limiters

As you continuously roll a sheet of clay through your pasta machine, overtime it will expand by getting wider and wider. In order to keep the sheet manageable, you can do two things:

  • After rolling your sheet of clay through, fold it again and tuck in sides in because the sheet will get wider, but shorter making it more difficult to fold later on. This helps prevent it from getting too wide.
    finger pressing yellow end of the folded skinner
    finger pushing in both sides of folded skinner blend
  • You can also place width limiters on your pasta machine to help prevent the clay from getting too wide, if you don’t have a width limiter, you can use a block of packaged clay.
    folded skinner blend running through pasta machine
  • You want to pass it through multiple times until the gradient effect looks smooth. This can range from 10 to 30 passes. The higher the contrast of colors, the more passes it will take. In the beginning, the sheet will look weird, but keep going, it’ll eventually work out.
  • Once the colors will start to actualize, and you want to keep an eye on it, so that the colors align as you fold it. Mauve should align with mauve, coral should align with coral and so on.
    finger pointing to yellow portion of skinner blend

Now that you have your newly created gradient sheet, what do you do with it?

3 color skinner blend gradient

After you’ve created your sheet, you can:

  • You can create beautiful backgrounds in your work (wether its in: jewelry-making, home decor, journal covers, wrappings around bake-able vessels or other accessory making projects).
  • You can create even larger sheets by either backing them with thicker layers of white clay or connect multiple sheets together at 45 degree angles.
  • Add texture to your blended backgrounds use coarse sand-paper, rubber texture plates, and much more.

Additionally, you can use your gradient sheets in other polymer clay techniques (such as): Canning, Gradient Loaves and Ribbons.

Did you find this helpful? Get notified of new content releases:

Sign up for News or Notifications

Playlist on Polymer Clay Beginner Tutorials

Playlist on Polymer Clay Cane Tutorials

Filed Under: Beginner Polymer Clay Tutorials

3 Easy Leaf Canes For Beginners (But Look Intricate)

November 28, 2021 by jennifoo

These leaf canes are beginner canes that vary in complexity in the way they look, i’m going to start with the most basic and gradually add in more steps to get more complex looking canes that are easy to do, but look pretty nifty with intricate patterns.

textured leaf slices
Textured & Intricate Leaf Cane Design
simple leaf canes slices laid out on table
Simple Leaf Cane Design
slices of simple and detailed leaf canes on table
Detailed Cane Design

You may continue reading, but if you’re like me who prefers to listen and see, you can watch in video format:

Subscribe to my Youtube Channel for daily videos here.

Basic Leaf Cane

Let’s start of with a Basic Leaf Cane:

simple leaf canes slices laid out on table

A simple leaf cane can be made by altering what’s called a gradient bull’s-eye cane. So grab a bulls’ eye cane, I show you have to make this in my Polymer Clay Canes for Beginners Tutorial so you can click this link to learn how to do it in a separate tab, then come back to this tutorial.

  1. The first step is to set your bull’s eye cane on its end and slice it in half down the middle with a tissue blade.
    knife slicing into polymer clay bullseye cane
  2. Then, roll out a sheet of colored clay to use as the leaf’s vein. The sheet should be very thin, using the 5th or 6th setting of your pasta machine.
  3. Next, trim the sheet to be as wide as the length of the cane and cut a straight edge along the end.
  4. Insert it halfway across one of the sliced cane halves. Reattach the other half of the cane and compress the cane together firmly before reducing the cane. Cane reduction is important to remove trapped air, close up gaps as it decreases the overall size of the cane.
    inserting vein into leaf cane
  5. When the cane is reduced to the desired diameter, create the pointed shape of the leaf by pinching the side opposite to the vein line.
  6. Check that the pinched ends are aligned parallel to one another, if not twist one end to get it parallel to the other end.
    correcting alignment of polymer clay cane
    Before we get into slicing, you want to wait about a day for the clay to firm up so that there is less pinching due to blade drag.
  7. To slice a teardrop-shaped cane, start at the round, wide end and slice the blade downward toward the tip at an angle. Flip the cane over after each slice to help maintain the teardrop shape. Using a clean, sharp tissue blade and firm clay would make this much easier. Because I ran out of Kato, i’m using Premo here and you can see there is a bit of pinching going on because of the softness of Premo and I wasn’t able to wait a day before slicing.

    In order to cut even slices, one cool trick is to use hair combs with varying widths between the teeth to help mark where to cut the next slice.
combed pressed into cane to create guide marks for cutting

Detailed Leaf Cane

Now that I showed you how to create a basic leaf cane, let’s turn it up a notch. I will show you how to create a variation of the previous cane by doing some assembling to create this type of pattern.

slices of simple and detailed leaf canes on table
  1. To start off take a gradient bullseye cane with a vein that I showed you made from the previous section and reduce the cane so you have at least 3 inches in length. 
  2. Cut it into even sections, and stack one piece over two with the veins facing upward. 
    one hand holding 2 bullseye canes together while adding one additional
  3. Compress and reduce to the desired diameter.
  4. Shape the cane by pinching the ends of the cane in the same way you did with the basic leaf cane.
    squishing assembled leaf cane into leaf shape
  5. Now you have a more detailed version of the cane you made previously, and feel free to have fun, experiment and invent your own leaf designs. 
    detailed leaf cane

Textured Leaf Cane

The next cane we are going to make is this texture leaf cane. Don’t let the intricate pattern fool you, it’s actually quite easy and fun to make. Once you learn this cane design, you’ll get another tool under your belt with the ability to create your own custom textures through slicing and clay compression techniques.

textured leaf slices
  1. To get started, grab 3 colors of clay and run them through the largest setting of your pasta machine. Fold it so that when it rolls through, it comes out narrow and long to make the next step easier.
  2. Cut two of the darkest colors into 1 x 3 inch rectangles, 2 of each color, for a total of 4 sheets. And cut the lightest color into one single 1×3 inch rectangle.
    5 variations of green sheets of clay
  3. Now you should have 5 total sheets. Stack the 5 sheets together from dark on the outsider to lightest on the inside. 
    layers of various colored green clay stacked
  4. Then you want to roll the clay through the largest setting of your pasta machine to meld the pieces together.
  5. Next, put your clay sheet to the side. And cut thin strips of white clay from a sheet rolled through the largest setting of the pasta machine that are about half-an-inch to an-inch long. Place these randomly over the clay sheet, all pointed vertically – these will help add some texture to your leaves.
    stacks of various colored green clay with white strips of clay on top
  6. After you’re done placing the white pieces of clay, roll the clay sheet through the largest setting of the pasta machine. Cut the sheet in half lengthwise, stack, and roll through the largest setting. And you want to repeat this 2 more times. Cutting them in half, stacking, rolling through the pasta machine. Cutting them in half, stacking, and rolling through.
    stack of clay being cut and laid on top of one another
  7. After that, cut the sheet in half stack them, but this time, do not don’t roll it through your pasta machine. You are going to cut it in half again, stack, and then have some fun with the next part.
    textured green clay with white strips being laid on top of one another
    At this point it might look something like this:
    stacks of green textured clay laid on top one another
  8. Compress the darker ends of the stack inward with your fingers and hands until you get a sort of a rounded cube. Next, use your fingers to shape it into a cylinder, then follow with the palm of your hands to mold it a bit, and lightly roll it across your work surface to round it.
    stacks of green clay being pressed by the sides
  9. After that, you want to locate where the tip of the leaf will be and that’s up to you, but I want the tip to be where the lightest clay ends at the top. And you want to pinch that area across the length of your cane making sure everything is parallel.
    textured leaf cane and finger pointing to light green line
    textured cane being molded into leaf shape
  10. Now you have your completed leaf cane! The techniques you learn doesn’t have to stop here, and can experiment with slicing and compressing the clay in different ways to create your own unique patterns. These could even turn into finger print designs if you want to, so let your imagination take you where you want to be.

Did you find this helpful? Get notified of new content releases:

Sign up for News or Notifications

Playlist on Polymer Clay Beginner Tutorials

Playlist on Polymer Clay Cane Tutorials

Filed Under: Polymer Clay Canning Tutorials

How to Create Polymer Clay Striped Jelly Roll Canes

November 27, 2021 by jennifoo

holding jelly roll cane

In this tutorial you will learn how to create some Striped Jelly Roll Canes. This is a great beginner cane design to learn as you hone your caning skills. And you can customize this by using various thicknesses of colors or by adjusting the height between the layers of clay.

You may continue reading, but if you’re like me who prefers to listen and see, you can watch in video format:

Subscribe to my Youtube Channel for daily videos here.

Step 1: Create Stripped Loaf

assortment of polymer clay sheet colors on table

To start off, select two or more colors to make a striped loaf. Loaves are essentially square canes, and i’ll go over step by step how to make one.

You will need your colors for the pattern — i’m using these four colors here.

And then you’ll need a contrasting color for the outlines inside the cane — and i’ll be using this dark brown for that.

Then take each sheet and run it into your pasta machine at your desired thickness. Here i’m using 0 as my thickness setting and making them all the same thickness, but you can play around with different thicknesses for each color which will change how the finished cane will look.

Then create a template at your desired dimensions for the loaf, for this example, I cut out a 1.5 x 4 inch template out of paper. Use this template as a guide in order to cut each sheet of clay so that they are all the same size.

cutting rectangles out of slabs of polymer clay

After that, you want to stack them on top of each other in a color arrangement that is pleasing to you. 

Next you want to reduce your loaf to get rid of any trapped air between layers and slice off one end of the cane so that you have one clean side to use for your future slices.

Step 2. Use Loaf Slices to Compile Jelly Cane

Now that you have created your loaf, you are going to uses the slices from it to create your jelly roll cane. So you’re using a cane to create another cane which lets you on your way to more advanced techniques — yay!

First grab your contrasting colored clay and run it through your pasta machine using a setting between the 4th and 6th thickness setting. Lay it down to use as a background strip and determine a length between 3 to 6 inches long. This will affect how wide your cane will be. I’ll be using around 4 inches for this example.

Then cut uniform slices from the loaf with a clean and sharp tissue blade. How thick you cut the slices will affect the size of the layers and change how the finished cane will look. Depending on the quality of the tissue blade you’re using you may some difficulty, but this one I got from Amazon works amazingly well and i’ll link in the description. I’m using it to cut a softer clay brand which is Fimo Soft. It works really well for square canes and cuts thin without warping the clay. 

After cutting your slices, lay each slice next to each other side by side with the striped pattern alternating along your thin strip of contrasting background clay.

placing sliced jelly roll cane onto brown sheet

After you are done laying down the loaf slices, cut off any excess clay from the sides so that the background layer is the same size as the layer of loaves above.

Step 3: Roll The Sheet Into The Jelly Cane

The last step is to roll your cane.

First cut a 45 degree angle along each end of your clay sheet. This will make rolling the loaf a lot easier from the core, and sealing it at the end.

Next, identify where you want to start the core of your jelly cane. Bend the edge of the background strip up and over to form a curl. Continue to roll the entire strip of striped clay until you are satisfied with the number of rotations in the cane. 

rolling up jelly roll cane

Now you have your newly created jelly roll cane! There are many ways you can use a jelly roll cane to create veneers, decorate furniture and build other shapes out of them. For example, i’m considering creating more of these and morphing them into quirky butterfly wings and compiling multiples of these canes together to produce an assembled butterfly cane. Let you imagination run wild and have fun with this project!

Thank you for watching until the very end, if you enjoying my videos, please hit the like button and i’ll see you next time.

Did you find this helpful? Get notified of new content releases:

Sign up for News or Notifications

Playlist on Polymer Clay Beginner Tutorials

Playlist on Polymer Clay Cane Tutorials

Filed Under: Polymer Clay Canning Tutorials

Polymer Clay Review – Sculpey vs FIMO vs Kato Polyclay

February 6, 2021 by jennifoo

Learn the differences between Sculpey III, Sculpey Premo, FIMO Professional, FIMO Soft, Kato Polyclay & Cernit

In this guide I go over 7 of some of the most popular types of polymer clay and discuss their properties so that you can make a better informed choice in terms of which polymer clay brand is best for you to purchase. 

Some clays are better designed for specific clay techniques like canning while others are better suited for individual preferences. For instance, those with arthritic hands may want softer clays, or jewelry makers may want firmer clays that bake with a professional sheen or those with really hot hands may want a clay that is harder and won’t get too sticky.

You may continue reading, but if you’re like me who prefers to listen and see, you can watch in video format:

Subscribe to my Youtube Channel for daily videos here.

Breakdown of the Most Popular Polymer Clay Types:

Sculpey III is a nice soft clay for beginners to make simple sculptures or figures and for softening harder clays.

Sculpey III assorted colors

Don’t use Sculpey III Polymer Clay if complexity & durability is a requirement. Sculpey III Applications/Uses: Viable alternative to firmer clays. Great for projects with density and bulk. Great for simple sculptures or figures. Can also use an as additive to color blends by mixing in a small portion with firmer clays to make them more pliable. My favorite combination is Kato and Sculpey III translucent.

Sculpey Premo is a medium-firm all purpose clay for beginners.

Sculpey Premo assorted colors

Sculpey Premo is favored among jewelry makers with its durability, ability to retain detail & slight sheen when baked. Sculpey Premo Applications/Uses: Jewelry Making. Faux Stones, Cartoon Figurines, Home Décor (vase & cutlery decoration), Sculptures, & Detailed Pieces. Most clay techniques (including surface techniques). All-purpose polymer clay & very versatile. Easy starter clay for beginners.    

Sculpey Souffle is a soft and stretchy clay that bakes with strength & durability for lightweight applications.

Sculpey Premo assorted colors

Sculpey Souffle is easy on arthritic hands. Sculpey Souffle Applications/Uses: Lightweight Applications. High quality clay that’s easy on arthritic hands. Jewelry Making & Knitting Techniques (it also takes paint very well). Chunky Figurines (too soft for detailed sculpting). Mokume Gane Technique because it slices easy with little distortion.

Fimo Pro is a firm, all-around clay for both beginners & professionals.

Sculpey Premo assorted colors

Fimo Professional was rebranded from FIMO Classic. It works in mildly cold/warm climates & trying out nearly all clay techniques. FIMO Applications/Uses: Great versatile clay for beginners to test out all clay techniques before investing in specialized clays. Professional quality clay for artist. Works in both warm & cold climates (however if overworked, can get sticky). Jewelry, Faux Stones, Canning, Stamping, Cartoon Figurines, Home Décor, Sculpting. Creating thin layers without tearing.

Fimo Soft is an alternative to firmer clays, that holds it shape well & conditions quickly.

Sculpey Premo assorted colors

Fimo Soft is an all-purpose clay for beginners/amateur artist at the hobby level. FIMO Soft Applications/Uses: Embellishments, Cartoon Figurines, Home Décor & Beads. Excellent for use with rubber stamps because it holds its shape well. Superior shelf life for cannings (canes made from softer clays are easier to recondition) All-purpose soft polymer clay.

Kato is a firm, all-purpose & professional quality clay for those with warm hands.

Sculpey Premo assorted colors

Kato Polyclay works exceptionally well for canning, faux stones, fine details & crisp lines. Applications/Uses: Works well in hot climates. Best clay for canning as it resists color blending. Precise Faux Stones & Beads with accurate color. Fine Detail Work including Strong Detailed Sculptures. Thin layers without tearing. All purpose clay for all clay techniques (with some exceptions).

Cernit is an all purpose clay that creates a luminous, porcelain-like finish.

Sculpey Premo assorted colors

Cernit polymer clay is one of the best translucent clays that doesn’t get too sticky. Applications/Uses: Favored among doll-makers. Hand-sculpted pieces with lots of color blending (translucency & softness increases ability to color blend). Jewelry & Faux Stones. In surface treatments: paints, silk screening, alcohol inks, chalks, powders, and varnish. Cernit Metallic & Shiny are great for mica shift technique.

Did you find this helpful? Get notified of new content releases:

Sign up for News or Notifications

Playlist on Polymer Clay Beginner Tutorials

Playlist on Polymer Clay Cane Tutorials

Filed Under: Beginner Polymer Clay Tutorials

4 Common Ways to Condition Polymer Clay

February 5, 2021 by jennifoo

All polymer clays must be conditioned before your began to work on them.

Failure to condition polymer clay, will lessen the finished strength of the baked clay. No matter how soft polymer clay is out of the packet, and even if it’s already conditioned the day before, if you want a stronger finish, condition your clay.

Why is conditioning polymer clay important?

After polymer clay has been sitting around for hours, the ingredients in polymer clay will settle and plasticizer in the clay can leech out into non-protected surfaces. Plasticizer is the most important ingredient you need to be aware of since it is what holds the particles of clay together. Conditioning removes trapped pockets of air and evenly redistributes the plasticizer and other ingredients in the clay. The will result in a more durable end-piece and cure with a stronger finish.

You may continue reading, but if you’re like me who prefers to listen and see, you can watch in video format:

Subscribe to my Youtube Channel for daily videos here.

How to Condition Polymer Clay:

#1: Manually Condition Polymer Clay

  • Soft clay brands like Sculpey III & Sculpey Premo can be easily conditioned with your hands, all you need to do is portion out a workable amount and knead it with the warmth of your hands.
  • If the clay is a bit firmer, tissue blades can make the process a bit faster. Slice the clay into smaller chunks, then knead the clay.
  • using blade to slice gold clay
  • kneading gold polymer clay

#2: Condition Polymer Clay with Pasta Machine

  • feeding gold polymer clay through pasta machine
  • For firmer clays, you can use a pasta machine to speed up the process of conditioning even though it’s possible to do it all by hand. I remember one time I had made 5 sets of earrings in one day, and by the next day my hands were so sore that I was just done and sick of kneading clay, so I realized how indispensable a pasta machine is if your working with clay on days that are back to back.
  • To condition your clay with a pasta machine you need to partially condition it first:
    • Chop your clay into smaller chucks. 
    • Set the dial to a thin setting between like 3 or 4. 
    • After it’s rolled out, fold the sides and feed it through again. 
    • Try to avoid having folds at the top because that can cause air bubbles. 
    • And repeat this process several times until you are able to fold it without cracking.
  • You can tell that the clay is adequately conditioned when you can fold it without cracking.

Condition brittle polymer clay

#3: Condition with Liquid Clay or Mineral Oil

Normally clay can be conditioned with the methods I discussed previously, but sometimes clay can be extra brittle. This is because overtime, plasticizer may leech out. Brittle and crumbly clay will need a little help by mixing it with products to condition it such as liquid clay, clay softener, or mineral oil.

  • Products like liquid clay or clay softener contain plasticizer and you can add a drop or two at time to soften the clay. 
    • Put the crumbled clay into a ziploc bag or plastic wrap with the conditioner and knead it until it becomes pliable. 
    • Be careful not to add too much conditioner at a time because overdoing it may cause your clay to get too soft and mushy.
  • Mineral oil on the other hand, does not contain plasticizer, but it does help moisten clay. Add mineral oil employing the same method I talked about earlier with liquid clay. Mineral oil can be found in your local drugstore in the baby section, be sure to get one that is fragrance-free. The reason why mineral oil is preferred over vegetable oil is because it will not go rancid. I don’t know about you, but rancid polymer clay is a big NOPE for me!
  • Personally, i’ll do a mixture of both liquid clay to add some plasticizer and mineral oil to moisten the clay. However, my favorite is using the clay mixing method listed below because it’s faster and simpler!

#4: Mix Soft Clay with Brittle Clay to change it’s consistency

You can make use of softer clays brands that have been sitting around on your shelf for a while, by mixing them with harder clays to customize the properties. For example, as a beginner I bought a ton of Sculpey III because there were a wider selection to choose from in my local craft store, but overtime, I realized I much prefer the finish and strength of Sculpey Premo for jewerly-making. I found that you can get a consistency similar to Sculpey Premo by mixing a itty bitty amount of Sculpey III translucent with Kato (or Fimo).

The softer Sculpey III clay tends to bake more porous, matte, and brittle – it’s not the best choice for professional projects, but it is immensely useful when mixed with more resilient brands like Fimo, Kato to get a clay that’s stronger than Sculpey III, but easier to work with than Fimo or Kato. Just be careful not to mix too much of it, since it can cause clay to get overly sticky and overworked fast.

How to leech polymer clay (if polymer clay is too sticky)

Now that we’ve gone over the most common ways to condition polymer clay, and discussed ways to fix brittle clay with too little plasticizer, let’s talk about how to do the reverse: how to fix clay that is too sticky because it has too much plasticizer by a technique called leeching.

How to tell if you have too much plasticizer in your clay?

Does you your clay gets overworked too quickly? Does it get too soft, too mushy and difficult to work with? Does it stick to your roller or pasta machine making things hard to clean. Does it smear like toothpaste and seems to think it’s play-doo and have trouble holding itself together? Maybe it leaves too many fingerprints and the texture is very hard to get smooth and nice. Maybe you just want to grab the thing and all it’s pieces and throw it out your window. If that’s the case, your clay may have too much plasticizer.

Leeching is a process of removing plasticizer from clay to make the clay firmer to work with. 

Just keep in mind that if leeching is overdone, it can lesson the finished strength of the piece and make your clay crumbly.

To begin the leeching process, sandwich thin slices of clay between several layers of copy paper. Place this on your work tile and set a book on top for a couple of hours and continue checking until it’s gets to the consistency you want.

Tips for conditioning polymer clay:

Here are some quick tips to keep in mind when conditioning clay.

  • It’s best to condition and work with the lighter colored clays first since clay is like a magnet and will pick up anything on your hands or work surface.
  • You can use baby wipes, for handling clay in between colors of clay. However, pick a brand that doesn’t leave lint your hands.
  • And lastly, mineral oil can be used to clean the rollers on your pasta machine since overtime plasticizer can have a chemical reaction to the steel rollers causing black streaks in your clay. Just take a towel with a few drops of mineral oil and wipe the rollers.

Thanks for reading this guide until the very end, if this was helpful please sign up for news and notifications from this blog. Goodluck with you polymer clay adventures!

Did you find this helpful? Get notified of new content releases:

Sign up for News or Notifications

Playlist on Polymer Clay Beginner Tutorials

Playlist on Polymer Clay Cane Tutorials

Filed Under: Beginner Polymer Clay Tutorials

  • 1
  • 2
  • 3
  • Next Page »

Quick Links

  • Recommended Polymer Clay Tools & Supplies

Polymer Clay Tutorials

Polymer Clay Canning Tutorials

Beginner Polymer Clay Tutorials

DIY Crafts

white clay earrings adorned with pearls

Shop Gorgeous Handmade Earrings

Recent Posts

  • Dreamy Butterfly Canes & Amazing Clay Hack
  • Easy Peasy Beautiful Feather Canes
  • Fireball Explosion Canes | Easy Cane Tutorial
  • 7 Caning Tips You Need to Know Before Starting
  • How to Enlarge & Connect Polymer Clay Designs
  • Boho Gifts Guide For the Quirky Free Spirit (Gifts For Her)
  • How to Effectively Clean Your Pasta Machine
  • Cute, Classy & Chic Gifts Guide (Classy Gifts She’ll Love)
We use cookies on our website to give you the most relevant experience by remembering your preferences and repeat visits. By clicking “Accept All”, you consent to the use of ALL the cookies. However, you may visit "Cookie Settings" to provide a controlled consent.
Cookie SettingsAccept All
Manage consent

Privacy Overview

This website uses cookies to improve your experience while you navigate through the website. Out of these, the cookies that are categorized as necessary are stored on your browser as they are essential for the working of basic functionalities of the website. We also use third-party cookies that help us analyze and understand how you use this website. These cookies will be stored in your browser only with your consent. You also have the option to opt-out of these cookies. But opting out of some of these cookies may affect your browsing experience.
Necessary
Always Enabled
Necessary cookies are absolutely essential for the website to function properly. These cookies ensure basic functionalities and security features of the website, anonymously.
CookieDurationDescription
cookielawinfo-checkbox-analytics11 monthsThis cookie is set by GDPR Cookie Consent plugin. The cookie is used to store the user consent for the cookies in the category "Analytics".
cookielawinfo-checkbox-functional11 monthsThe cookie is set by GDPR cookie consent to record the user consent for the cookies in the category "Functional".
cookielawinfo-checkbox-necessary11 monthsThis cookie is set by GDPR Cookie Consent plugin. The cookies is used to store the user consent for the cookies in the category "Necessary".
cookielawinfo-checkbox-others11 monthsThis cookie is set by GDPR Cookie Consent plugin. The cookie is used to store the user consent for the cookies in the category "Other.
cookielawinfo-checkbox-performance11 monthsThis cookie is set by GDPR Cookie Consent plugin. The cookie is used to store the user consent for the cookies in the category "Performance".
viewed_cookie_policy11 monthsThe cookie is set by the GDPR Cookie Consent plugin and is used to store whether or not user has consented to the use of cookies. It does not store any personal data.
Functional
Functional cookies help to perform certain functionalities like sharing the content of the website on social media platforms, collect feedbacks, and other third-party features.
Performance
Performance cookies are used to understand and analyze the key performance indexes of the website which helps in delivering a better user experience for the visitors.
Analytics
Analytical cookies are used to understand how visitors interact with the website. These cookies help provide information on metrics the number of visitors, bounce rate, traffic source, etc.
Advertisement
Advertisement cookies are used to provide visitors with relevant ads and marketing campaigns. These cookies track visitors across websites and collect information to provide customized ads.
Others
Other uncategorized cookies are those that are being analyzed and have not been classified into a category as yet.
SAVE & ACCEPT

Get creative inspiration and updates from Jennifoo right to your inbox.