A beginner polymer clay tutorial for making easy, but gorgeous feather canes in step by step walkthrough. You’ll be surprised relatively simple the steps are!

Step 1:
How to Create Simple Gradient Blend
Start off by creating a navy, pink and white gradient blend. Each of the 3 colors weigh about 12 grams, but I would recommend using a little more like 16 grams if you want thicker leaf sections.
I roughly cut out triangles for the skinner blend and piece them together. This shows that you don’t have to measure out perfect triangles to create a skinner blend. Then I run it through the pasta machine multiple times until it is well-blended.


Step 2:
Convert Clay Gradient Sheet to Roll

Next, you want to convert your gradient sheet into a roll. You want to start at the end where you have all colors rather than a side where there is just one color. Roll tightly to avoid gaps of air, but being careful not to squish the clay.
Step 3:
Transform Gradient Roll to Plug Shape

After you’ve turned it into a roll, the next step would be to transform this into a plug shape. Use a combination of compressing the ends inward, rolling it across the table and continuously compressing. You want to get it around 1.5 inches with a diameter just under an inch.
Step 4:
Transform to Gradient Rectangle Cane

Next, we you want to turn this plug shape into a rectangle. Set your plug on flat surface, get a roller, and roll over each side. Then using your fingers to refine the rectangle shape. After that, you should get something that looks like this.
The reason why we turned the gradient into a plug, then a rectangle, is so that we would be able to stretch the rectangle vertically to get a tall gradient sheet as opposed to a wide one.
Start the reduction process using a series of pinching motions across the entire surface of the rectangle cane. I also like to press it down onto a flat surface to help keep the sides flat. And pushing down any bumps that occur.
After you get to about 1.5 inch in width, you may use a roller to help flatten it a bit more until the clay sheet is about 1/4 of an inch deep. Next, run it through the largest setting of your pasta machine. You can reduce the thickness if you want the sections of the feather to be thinner.


Step 5:
Create Feather Cane Components
Next, grab a sheet of white or black clay and run it through the 6th setting of your pasta machine to get a long sheet of clay. This will be the barbs of your feather. Being careful to avoid air bubbles. Set your gradient blend on top of the thin sheet and cut off the excess clay from the sides.


Then you want to grab the main body and place it over another thin white sheet so that the top and bottom of the gradient blend is covered with white clay. Cut off any imperfections from the sides. I use an xacto knife to pop any air bubbles and my fingers to smoothen the texture.
Next, divide your clay into 8 equal sections. Miraculously, my sheet ended up being 8 inches in length which made it easy to mark and slice my cane components. You clay component should look something like this.

Step 6:
Compile Feather Cane Components into Staircase
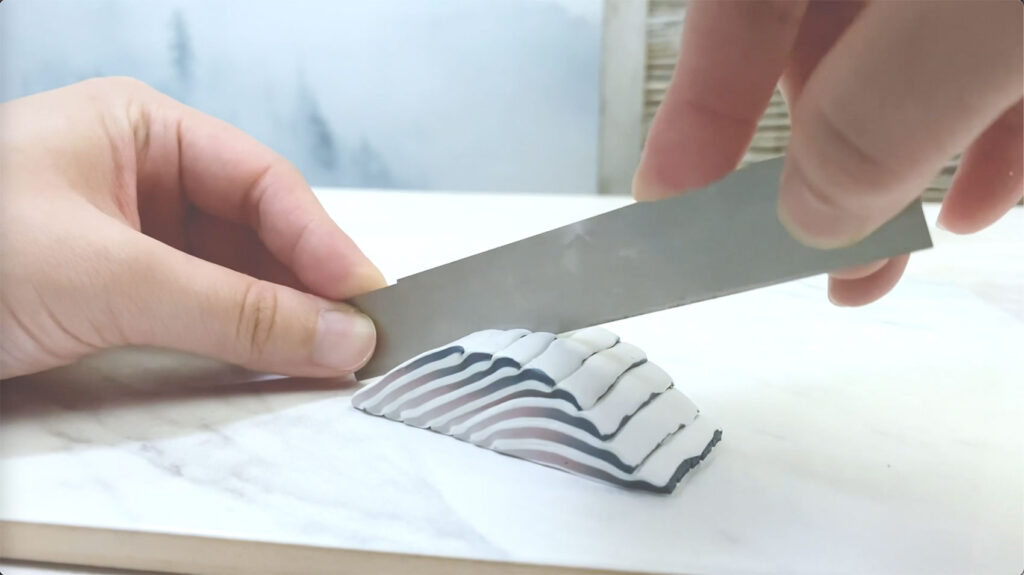
Set it down on a flat surface. And create a staircase by offsetting the next piece about 1/4 of an inch from the previous piece. And you want to keep doing this for all 8 pieces.

Next, you want to turn this into a semicircle. Push the staircase downward and compress the sides. I use a combination of pinching across the entire surface of the cane, compressing against a flat surface, and then repeatedly pinch to blend the edges.
Step 7:
Assemble Feather Cane Components
Now you should have one half of your feather cane. Slice the cane in half so you get two pieces of a circle. But before you connect the two pieces together, you want to add the vein of the leaf. Choose a color for the vein, roll it through the 6th largest setting of your pasta machine, and insert it 2/3rds of the way from the end, then connect the 2 halves together and cut off the excess clay.


Do some finishing touches with your fingertips to sharpen the point at the top of the feather and to smooth the sides.

Step 8:
Feather Cane Reduction
In order to reduce the feather cane, set it on a flat surface. Take both hands at the opposite ends and compress towards the center and upwards. Apply pressing motions to the bottom of the feather to round it a bit. I also like to add some scrap cray to the ends to reduce the amount of distortion i’ll have to cut off later.


After you’ve reduced it to your desired size, cut off the scrap clay and make your cane slices.
Now you have your completed feather cane. I hope y’all enjoyed this caning tutorial. Please subscribe to my Youtube channel if this was helpful, and good-luck with your next polymer clay project!

Here’s a video version of this tutorial if you would like the supplementation. Don’t forget to have fun!
Did you find this helpful? Get notified of new content releases:
Sign up for News or Notifications