An eye-popping retro funk cane tutorial with explosive fireballs, thunderbolts shooting from the center, and electrical flame shapes. I mean why not? If you are new to caning this is a great tutorial for you to get hands on and invoke your sense of imagination and spark your creativity.

While these may look complex, they are actually great beginner canes that are fun to make and allow you to experiment in the process even if it gets messy, you’ll be able to create unique and interesting designs. The key is to not get too caught up in perfection. This cane tutorial will only require basic tools such as your hands, a roller, and a blade. So let’s get started.
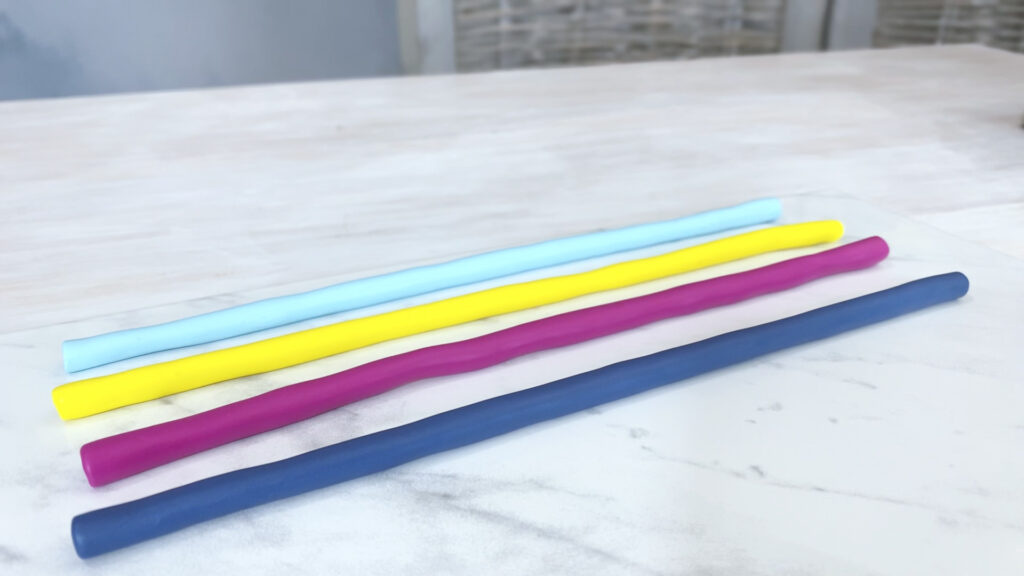
Here, i’m doing some retro funk themed colors starting from lightest to dark, I custom mixed a sky blue, a medium yellow, this magenta was already premixed in the package, and midnight blue. The light blue and yellow has a lot of white which is softer than the others color, so I mixed in a dab of Sculpey III transparent to the midnight blue and magenta to hopefully make the consistency a bit more even throughout.
Step 1: Choose 4 Colors, Create & Mold Cane Snakes
Each of the 4 colors of clay, should be about 1/4th of a block, which is approximately .5 ounces. I started weighing clay so I can be sure I have an even amount of each color and not have to accumulate more scrap clay than I need to. And you want two of the colors to be high in contrast to one another. In this cane tutorial, i’ll be using Fimo polymer clay.
Roll each color into snakes that are 1/4th of an inch in diameter. Start from light to dark, to minimize color contamination. Don’t worry about keeping the snakes perfectly neat and uniform at this stage. Each snake should be about 9-inches or longer.

Next, pinch the clay snake between both thumbs and forefingers. This will form the diameter into a smooshed diamond shape. Do this along the entire length of each clay snake. I found the easiest way to go about this is to sort of hang it from a table while smooshing which helps give it some support and makes the process go more smoothly.
After that, cut each snake into about 1.25-inch lengths so that you get multiple pieces to assemble your cane.

Step 2: Assemble the Cane
To start off, you can choose a light colored clay. Before starting, you can redefine the diamond shape a bit, it’ll make the next steps easier. Do this for all the colors.
After that, build up a column of 4 pieces of the same colored clay by attaching each piece on top of one another. The next step is to fill in the front and back sides of the column of clay. You want to choose a contrasting color for this. Fill the 3 gaps on the front and the 3 at the back.


After you filled in the sides of the center column with 3 colors, continue to fill in the gaps with the remaining colors altering between using 4 and 3 pieces. You can experiment a bit if you’d like.
Also note that it’s okay if you see some distortion, because it can enhance the patterning of the cane. However, it is important to fill in gaps completely when adding components so that they either interlock or overlap, you just don’t want to leave trapped air between layers of clay.
Step 3: Compression & Reduction
Compress the block into a rectangular shape.


Next, add blocks of scrap clay to the ends. This is a neat little trick that will minimize the amount of distortion you will have to cut off at the ends after cane reduction.
Apply further compression and reduction techniques to reduce the cane to 7 inches in length.
You don’t have to do this, but at this stage I’ve made 2 copies of this cane in order to show you how to make different variations from this point, one will be used for 2 variations of kaleidoscope designs in SEC 4, and the other will be used for 1 mirror cane design in SEC 5.
SEC 4A:
Kaleidoscope Canes
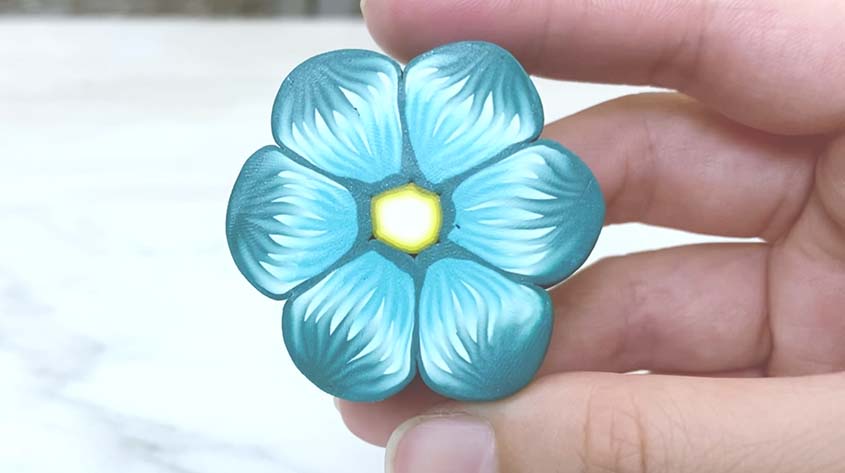
Kaleidoscope Canes are made up of 6 equilateral triangles or 3 diamonds.
Take the level 1 base cane from the previous section (step 3) and trim off the distorted ends. Cut the cane into 4 equal sections and stack one over the other. You do not need to match the patterns. In fact, the less perfect the assembly, the more interesting the finished pattern will be. Then compress the cane into a square (use a mixture of compressing the back and front faces of the cane) and pinching across the length of the canes or pushing the sides against a clay-safe flat surface. After it is a square, reduce it to 7-inches long again.


Next, i’m about to demonstrate 2 alternative kaleidoscope designs using the square loaf i’ve just created as starting point. So you should have reduced it to 7-inches for your cane. But i’ve reduced it smaller to 14 inches so that I can cut in half and show you 2 different variations. You don’t have to do this, if you only want to go with 1 design of your choice.
SEC 4B:
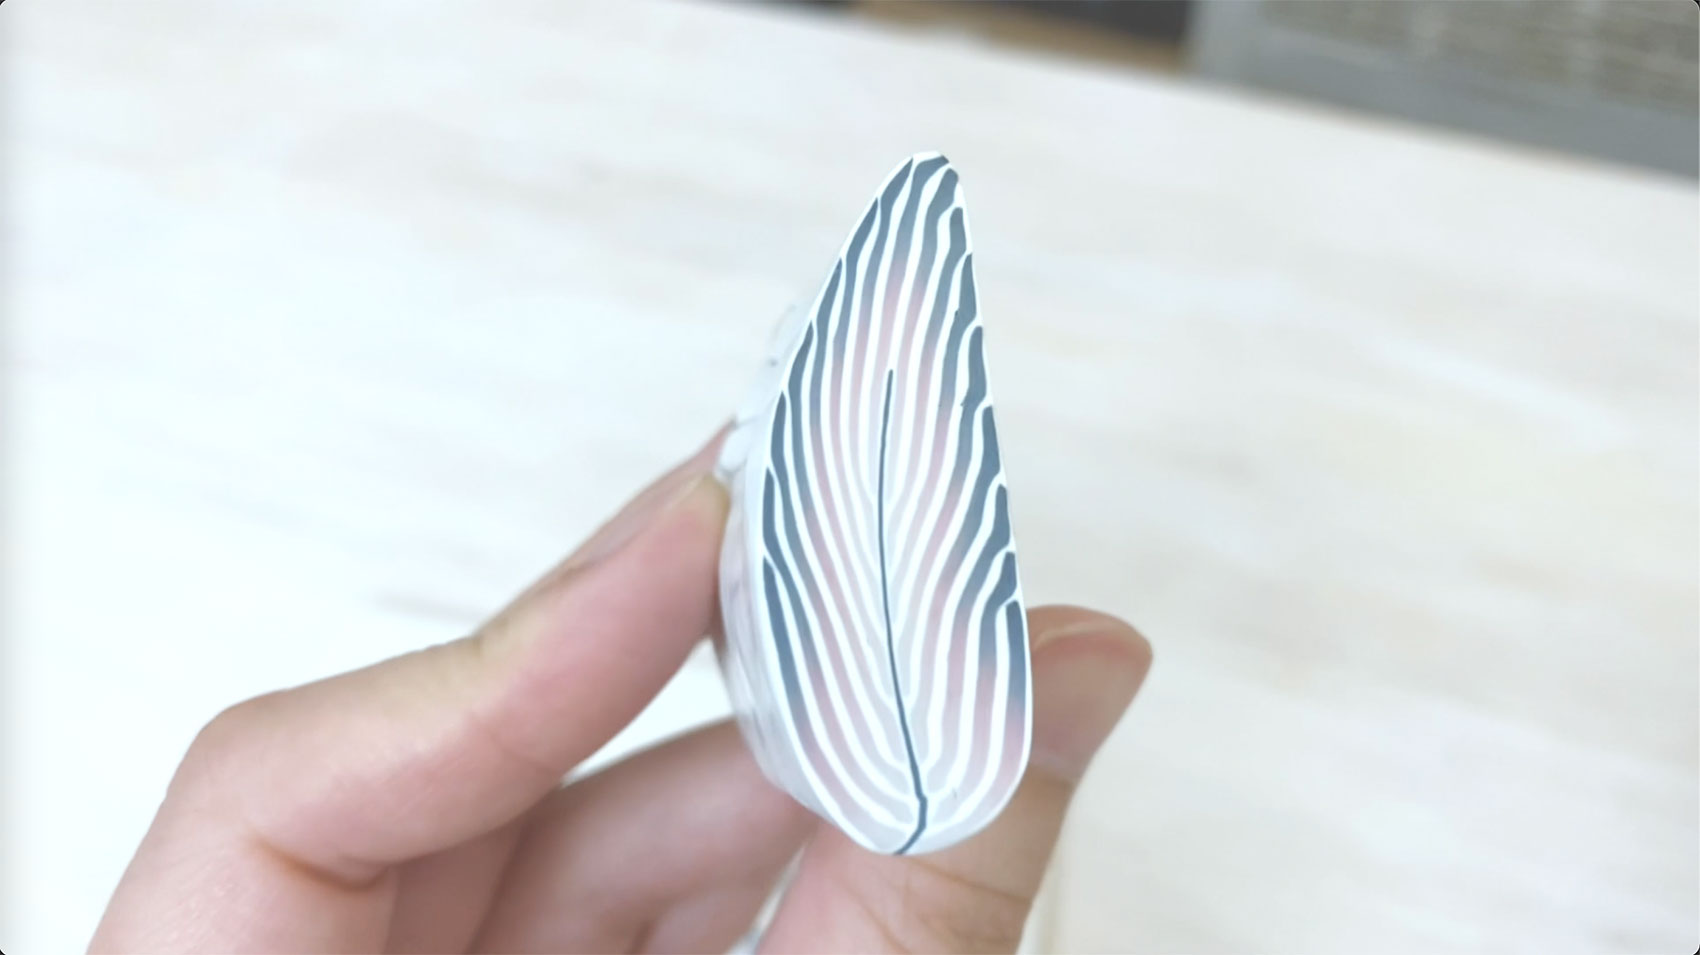
Kaleidoscope Cane Design: Fireball Cane

For the first variation: Take the square loaf from the starting point from SEC 4A, and pinch the cane into a triangle shape. Depending on where you pinch it, will affect the look. For this variation, i’m pinching starting from the solid blue end. I found it easier, to set it on a table and do the pinching across the entire length of the cane.


After that, cut the cane into 3 equal lengths and assemble the pieces into a fanlike semicircle. Then, cut that cane in half. Take the two halves and piece them together to form a completed hexagon or circle shape. Now you have your completed kaleidoscope cane design which to me, sort of looks like a blazing tumbleweed, but yours may look completely different and that’s okay. That’s the beauty of this technique is that it’ll create some unique designs and patterns depending on who makes it.
SEC 4C:
Kaleidoscope Cane Design: Electric Wave Cane

Take the leftover copy created in SEC 4A (where we cut the 14inch cane into 2 copies). And instead of pinching from the solid blue end, i’m pinching from the side with yellow. Go through the same process as previously.


After pinching, cut the cane into 3 equal lengths, assemble the pieces into a semicircle. Cut the cane in half, then piece them together again. Now you have your completed kaleidoscope cane design variation, this one sort of looks like lightning bolts shooting from the center. It’s cool how simply pinching from a different starting point, can give you new designs to play with.
SEC 5:
Electrical Flames Mirror Canes

Mirror canes, are made up of 4 mirrored sections that mirror along 4 sides. In this section we’ll be creating a mirror cane, and using the slices to assemble a mirror pattern.
To make a mirror cane, i’m grabbing the last copy of cane base level 1 created all the way back in STEP 3 (as a recap I created two copies of the level 1 base, then took one of the copies to create two other level 2 bases that formed the fireball and electric wave canes).

Cut off the distorted ends, then cut it into 4 equal lengths, stack them on top of one another. Then compress the cane into a square. After it is a square, reduce it to 7-inches long again. Then pinch parallel to the core center column across the length of the cane to turn it into a triangular shape.


If these steps sounds familiar, that’s because the mirror canes do share the initial same steps followed by the kaleidoscope canes, but here’s where we’ll do things a little differently. Instead of cutting into 3 pieces, cut it into 2 pieces, then mirror the 2 halves so that it now has a diamond shape.


Next, compress the points of the diamond inward to form a square shape. You can use a combination of techniques to create the square shape by pressing the cane against a clay safe table and or using a roller to roll across the sides of the square.


Now you have your mirror cane. In order create the mirror effect, cut out 4 slices, and arrange them, rotate or flip them, so that the pieces mirror each other and you can play around with making your own patterns as your desire.

I hope y’all enjoyed this tutorial, i’m getting feedback that’ll y’all love making canes which i’m delighted to hear, and i’ll be producing more cane videos as well as other polymer clay tutorials in the near future.
To make sure you don’t miss these videos, I invite y’all to subscribe to my channel and hit the notification bell that pops up next to it, that way you get an alert when my next video is up.
Here’s a video version of this tutorial. Goodluck!
Did you find this helpful? Get notified of new content releases:
Sign up for News or Notifications