These leaf canes are beginner canes that vary in complexity in the way they look, i’m going to start with the most basic and gradually add in more steps to get more complex looking canes that are easy to do, but look pretty nifty with intricate patterns.


You may continue reading, but if you’re like me who prefers to listen and see, you can watch in video format:
Basic Leaf Cane
Let’s start of with a Basic Leaf Cane:
A simple leaf cane can be made by altering what’s called a gradient bull’s-eye cane. So grab a bulls’ eye cane, I show you have to make this in my Polymer Clay Canes for Beginners Tutorial so you can click this link to learn how to do it in a separate tab, then come back to this tutorial.
- The first step is to set your bull’s eye cane on its end and slice it in half down the middle with a tissue blade.

- Then, roll out a sheet of colored clay to use as the leaf’s vein. The sheet should be very thin, using the 5th or 6th setting of your pasta machine.
- Next, trim the sheet to be as wide as the length of the cane and cut a straight edge along the end.
- Insert it halfway across one of the sliced cane halves. Reattach the other half of the cane and compress the cane together firmly before reducing the cane. Cane reduction is important to remove trapped air, close up gaps as it decreases the overall size of the cane.

- When the cane is reduced to the desired diameter, create the pointed shape of the leaf by pinching the side opposite to the vein line.
- Check that the pinched ends are aligned parallel to one another, if not twist one end to get it parallel to the other end.

Before we get into slicing, you want to wait about a day for the clay to firm up so that there is less pinching due to blade drag. - To slice a teardrop-shaped cane, start at the round, wide end and slice the blade downward toward the tip at an angle. Flip the cane over after each slice to help maintain the teardrop shape. Using a clean, sharp tissue blade and firm clay would make this much easier. Because I ran out of Kato, i’m using Premo here and you can see there is a bit of pinching going on because of the softness of Premo and I wasn’t able to wait a day before slicing.
In order to cut even slices, one cool trick is to use hair combs with varying widths between the teeth to help mark where to cut the next slice.

Detailed Leaf Cane
Now that I showed you how to create a basic leaf cane, let’s turn it up a notch. I will show you how to create a variation of the previous cane by doing some assembling to create this type of pattern.
- To start off take a gradient bullseye cane with a vein that I showed you made from the previous section and reduce the cane so you have at least 3 inches in length.
- Cut it into even sections, and stack one piece over two with the veins facing upward.

- Compress and reduce to the desired diameter.
- Shape the cane by pinching the ends of the cane in the same way you did with the basic leaf cane.

- Now you have a more detailed version of the cane you made previously, and feel free to have fun, experiment and invent your own leaf designs.

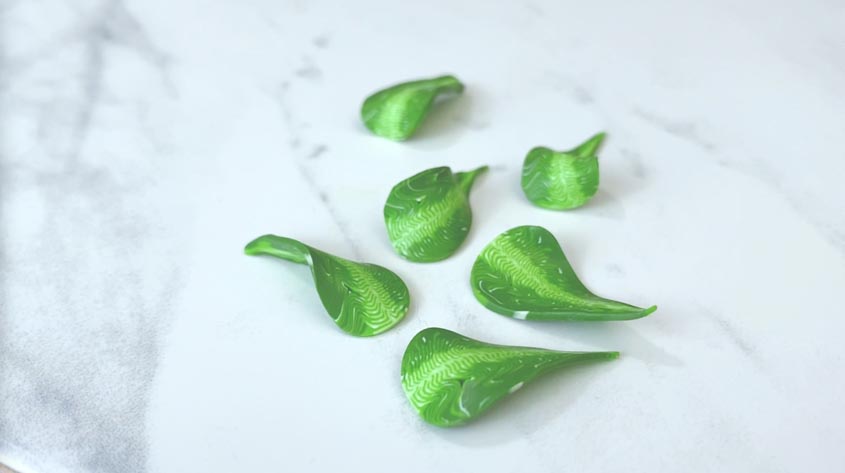
Textured Leaf Cane
The next cane we are going to make is this texture leaf cane. Don’t let the intricate pattern fool you, it’s actually quite easy and fun to make. Once you learn this cane design, you’ll get another tool under your belt with the ability to create your own custom textures through slicing and clay compression techniques.
- To get started, grab 3 colors of clay and run them through the largest setting of your pasta machine. Fold it so that when it rolls through, it comes out narrow and long to make the next step easier.
- Cut two of the darkest colors into 1 x 3 inch rectangles, 2 of each color, for a total of 4 sheets. And cut the lightest color into one single 1×3 inch rectangle.

- Now you should have 5 total sheets. Stack the 5 sheets together from dark on the outsider to lightest on the inside.

- Then you want to roll the clay through the largest setting of your pasta machine to meld the pieces together.
- Next, put your clay sheet to the side. And cut thin strips of white clay from a sheet rolled through the largest setting of the pasta machine that are about half-an-inch to an-inch long. Place these randomly over the clay sheet, all pointed vertically – these will help add some texture to your leaves.

- After you’re done placing the white pieces of clay, roll the clay sheet through the largest setting of the pasta machine. Cut the sheet in half lengthwise, stack, and roll through the largest setting. And you want to repeat this 2 more times. Cutting them in half, stacking, rolling through the pasta machine. Cutting them in half, stacking, and rolling through.

- After that, cut the sheet in half stack them, but this time, do not don’t roll it through your pasta machine. You are going to cut it in half again, stack, and then have some fun with the next part.

At this point it might look something like this:
- Compress the darker ends of the stack inward with your fingers and hands until you get a sort of a rounded cube. Next, use your fingers to shape it into a cylinder, then follow with the palm of your hands to mold it a bit, and lightly roll it across your work surface to round it.

- After that, you want to locate where the tip of the leaf will be and that’s up to you, but I want the tip to be where the lightest clay ends at the top. And you want to pinch that area across the length of your cane making sure everything is parallel.


- Now you have your completed leaf cane! The techniques you learn doesn’t have to stop here, and can experiment with slicing and compressing the clay in different ways to create your own unique patterns. These could even turn into finger print designs if you want to, so let your imagination take you where you want to be.
Did you find this helpful? Get notified of new content releases:
Sign up for News or Notifications